close
MailChimp is an email marketing service, helps to manage the subscribers of your website. MailChimp provides an easy way to integrate email signup form in your website and send the email newsletter to the subscriber. Beside the premium plan MailChimp also has a forever free plan. Using the free plan, you can add up to 2,000 subscribers to MailChimp and send 12,000 emails per month to the subscriber.
In this tutorial, we’ll show you how to integrate newsletter subscription form in your website and add subscriber to list with MailChimp using PHP. We’ll use MailChimp API 3.0 and PHP to add subscriber to list without confirmation email.
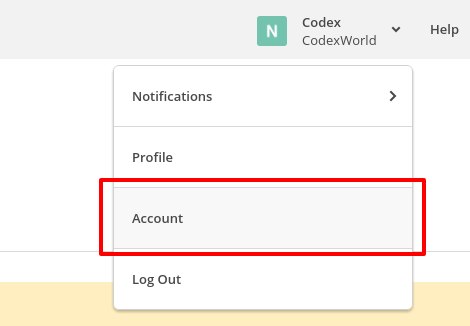
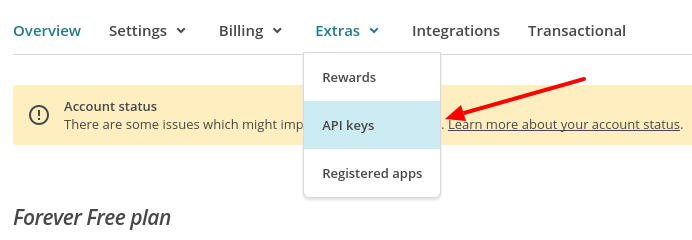
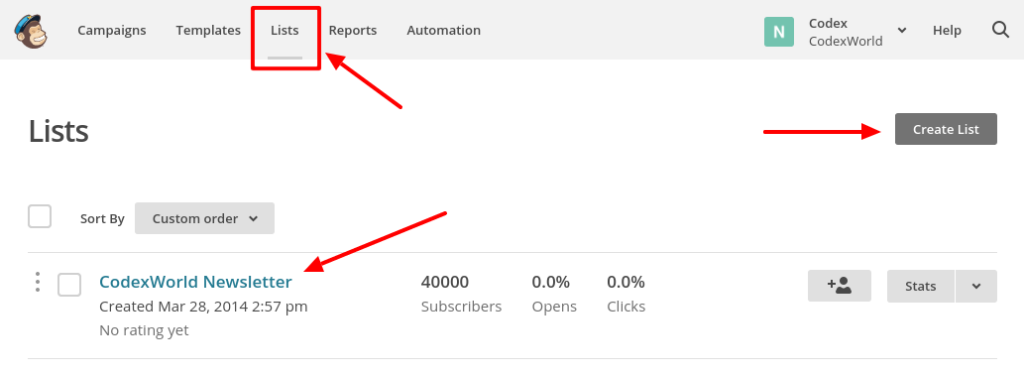
To integrate MailChimp API in PHP you need a MailChimp API Key and List ID where you want to add members. Before you begin, sign up for a MailChimp account and follow the below steps to get API Key and List ID.


In our example script, a simple newsletter subscription form will be implemented. Once the user submits the subscription form along with the details (First Name, Last Name, and Email), respective details would be added to the list of MailChimp account using MailChimp API and PHP. Also, the subscriber would be able to receive the newsletter of your website via MailChimp.
The index.php file contains the custom subscription form HTML. The subscriber needs to enter their First Name, Last Name, and Email. By clicking on SUBSCRIBE button, the form will submit to the action.php file for adding the subscriber to the MailChimp subscriber list.
<?php session_start(); // place it on the top of the script ?>
<?php
    $statusMsg = !empty($_SESSION['msg'])?$_SESSION['msg']:'';
    unset($_SESSION['msg']);
    echo $statusMsg;
?>

<form method="post" action="action.php">
    <p><label>First Name: </label><input type="text" name="fname" /></p>
    <p><label>Last Name: </label><input type="text" name="lname" /></p>
    <p><label>Email: </label><input type="text" name="email" /></p>
    <p><input type="submit" name="submit" value="SUBSCRIBE"/></p>
</form>
In the action.php file, subscription form data is received and send the subscriber details to the MailChimp using MailChimp API and PHP. To Use MailChimp API, you need to mention API Key and List ID. Insert the API Key and List ID which you’ve got in the previous step.
Here cURL is used to send an HTTP POST request to the List Members endpoint with member information. After adding the subscriber to MailChimp list, the call returns a response. Based on the response ($httpCode), the status message would be shown to the subscriber.
To add a subscriber, you must include the subscriber’s status in your JSON object. If you include the subscriber’s status subscribed, subscriber email address would be added right away without sending a confirmation email. Use pending status to send a confirmation email to subscriber.
<?php
session_start();
if(isset($_POST['submit'])){
    $fname = $_POST['fname'];
    $lname = $_POST['lname'];
    $email = $_POST['email'];
    if(!empty($email) && !filter_var($email, FILTER_VALIDATE_EMAIL) === false){
        // MailChimp API credentials
        $apiKey = 'InsertMailChimpAPIKey';
        $listID = 'InsertMailChimpListID';

        // MailChimp API URL
        $memberID = md5(strtolower($email));
        $dataCenter = substr($apiKey,strpos($apiKey,'-')+1);
        $url = 'https://' . $dataCenter . '.api.mailchimp.com/3.0/lists/' . $listID . '/members/' . $memberID;

        // member information
        $json = json_encode([
            'email_address' => $email,
            'status'        => 'subscribed',
            'merge_fields'  => [
                'FNAME'     => $fname,
                'LNAME'     => $lname
            ]
        ]);

        // send a HTTP POST request with curl
        $ch = curl_init($url);
        curl_setopt($ch, CURLOPT_USERPWD, 'user:' . $apiKey);
        curl_setopt($ch, CURLOPT_HTTPHEADER, ['Content-Type: application/json']);
        curl_setopt($ch, CURLOPT_RETURNTRANSFER, true);
        curl_setopt($ch, CURLOPT_TIMEOUT, 10);
        curl_setopt($ch, CURLOPT_CUSTOMREQUEST, 'PUT');
        curl_setopt($ch, CURLOPT_SSL_VERIFYPEER, false);
        curl_setopt($ch, CURLOPT_POSTFIELDS, $json);
        $result = curl_exec($ch);
        $httpCode = curl_getinfo($ch, CURLINFO_HTTP_CODE);
        curl_close($ch);

        // store the status message based on response code
        if ($httpCode == 200) {
            $_SESSION['msg'] = '<p style="color: #34A853">You have successfully subscribed to CodexWorld.</p>';
        } else {
            switch ($httpCode) {
                case 214:
                    $msg = 'You are already subscribed.';
                    break;
                default:
                    $msg = 'Some problem occurred, please try again.';
                    break;
            }
            $_SESSION['msg'] = '<p style="color: #EA4335">'.$msg.'</p>';
        }
    }else{
        $_SESSION['msg'] = '<p style="color: #EA4335">Please enter valid email address.</p>';
    }
}
// redirect to homepage
header('location:index.php');
This example code helps to add subscribers to mailChimp list from the website through custom subscription form. You can see the added subscriber’s list from MilChimp account. Login to your MailChimp account and go to the subscriber’s list, you’ll see the newly added subscribers in the list.
Do you want to get implementation help, or enhance the functionality of this script? Click here to Submit Service Request
how to do this in wordpress i have a custom plugin like contact form
Thanks a lot Dude for the code… May you grow faster & faster…
thank u so much for this code ..thanks alot again
It appears that you should use POST instead of PUT
Also remove the .” $memberID;” from the $url.
I use http code 400 instead of 214 if someone already subscribed.
Reference:
– https://stackoverflow.com/questions/44630184/mailchimp-api-status-200-for-members-who-are-already-subscribed
As Bruno commented before: “case 214 (when email is already in the list) isn’t throwing the error… Any ideas?”
Great buddy
Really i appreciate it,if you don’t mind i just one suggestion please add you voice in video please do not add music.
otherwise its too good thank a lot brother.
Hi, thanks for the great source code. I am using the form in a WordPress code block and the action script is located on my hosting server. The form itself works well, the info is added in to the mailchimp list. However, I am encountering the “White Screen of Death”, where the user is redirected to the form action PHP file url. I even removed the header redirect and the problem persists.
Hi, I want to thank you for this code! It works splendidly!
Well, I cannot say thank you enough! Just copied and pasted – no errors, no nothing, only working as advertised!
This made it easier for me. But what about unsubscribing, how do i go about it
very good work
Hello Thank you very much, just what I was looking for had a month looking at the mailchimp page.
Hello, I cannot add a field for example address or phone, Can you help me?
It’s cool, working fine… thanks!!
Great tutorial! I was able to easily implement this code in a new website.
Thank you for taking the time to share.
–Raul
Thanks for making it so simple, worked first time!
how to subscribe unsubcribe in the people using that form and get response .
Hi!! The code is great, but instead of showing the message after subscription, it simple redirects to the home page! How to remain in the same page and read the message just like in the video? Tks
@Gabi Just remove the
header()function.Awesome source from Codexworld. Thanks lot.
Hi, case 214 (when email is already in the list) isn’t throwing the error… Any ideas?
Hi,
how to convert into Codeigniter?
Thanks!