close
WordPress has a way where developers can create custom fields to the post. With this way we can extend WordPress functionality and fulfill our requirement. This extra custom fields data is known as meta-data. Meta data allow you to add some additional data to the post.
In this tutorial we will discuss how to create WordPress custom fields and insert some additional data to the post. This step by step tutorial provides you an easy way to add custom post meta box in WordPress.
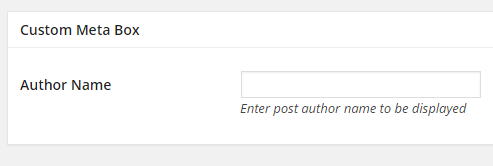
Now we will add a custom meta box into post adding page. Through this custom meta box we will insert the author name of post. Also we will display the author name of respective post at the post listing page or post details page.
All the meta box related working will be done in theme’s functions.php file. So, open the functions.php file of current active theme and follow the below steps.
add_meta_box() function is used to add meta boxes to the administrative interface. The below code is used for add meta box to the post.
/*
* Add the Custom Meta Box
*/

function add_custom_meta_box() {
    add_meta_box(
        'custom_meta_box', // $id
        'Custom Meta Box', // $title
        'show_custom_meta_box', // $callback
        'post', // $page
        'normal', // $context
        'high' // $priority
    );
}
add_action('add_meta_boxes', 'add_custom_meta_box');
In the following code, we have generated an array of custom meta fields. Now we have to define the callback function (show_custom_meta_box()) and generate the view of the meta box into this function (show_custom_meta_box()).
// Custom meta fields array
$prefix = 'custom_';
$custom_meta_fields = array(
    array(
        'label'=> 'Author Name',
        'desc'  => 'Enter post author name to be displayed',
        'id'    => $prefix.'author_name',
        'type'  => 'text'
    )
);

// The callback function
function show_custom_meta_box() {

    global $custom_meta_fields, $post;

    // Use nonce for verification
    echo '<input type="hidden" name="custom_meta_box_nonce" value="'.wp_create_nonce(basename(__FILE__)).'" />';

    // Begin the field table and loop
    echo '<table class="form-table">';

    foreach ($custom_meta_fields as $field) {
        // get value of this field if it exists for this post
        $meta = get_post_meta($post->ID, $field['id'], true);
        // begin a table row with
        echo '<tr>
                <th><label for="'.$field['id'].'">'.$field['label'].'</label></th>
                <td>';
                switch($field['type']) {
                    // text field
                    case 'text':
                        echo '<input type="text" name="'.$field['id'].'" id="'.$field['id'].'" value="'.$meta.'" size="30" />
                            <br /><span class="description">'.$field['desc'].'</span>';
                    break;
nbsp;               }
        echo '</td></tr>';
    }

    echo '</table>';

}
Go to the post adding page and you can see the custom meta box and custom post fields under the post content editor. Into this field you can add the custom author name of the post.

Now it’s time to save the meta data. The below code is use to save the post meta data.
// Save the custom meta data
function save_custom_meta($post_id) {

    global $custom_meta_fields;

    // verify nonce
    if (!wp_verify_nonce($_POST['custom_meta_box_nonce'], basename(__FILE__)))
        return $post_id;

    // check autosave
    if (defined('DOING_AUTOSAVE') && DOING_AUTOSAVE)
        return $post_id;

    // check permissions
    if ('page' == $_POST['post_type']) {
        if (!current_user_can('edit_page', $post_id))
            return $post_id;
        } elseif (!current_user_can('edit_post', $post_id)) {
            return $post_id;
    }

    // loop through fields and save the data
    foreach ($custom_meta_fields as $field) {
        $old = get_post_meta($post_id, $field['id'], true);
        $new = $_POST[$field['id']];
        if ($new && $new != $old) {
            update_post_meta($post_id, $field['id'], $new);
        } elseif ('' == $new && $old) {
            delete_post_meta($post_id, $field['id'], $old);
        }
    }
}
add_action('save_post', 'save_custom_meta');
get_post_meta() function returns the values of the custom fields with the specified key from the specified post. We will get all the custom meta data and display custom field value from custom meta data array by specific meta key.
<?php
    // Get the post meta data
    $meta = get_post_meta( get_the_ID() );

    // Get custom meta value
    $post_author_name = $meta['custom_author_name'][0];

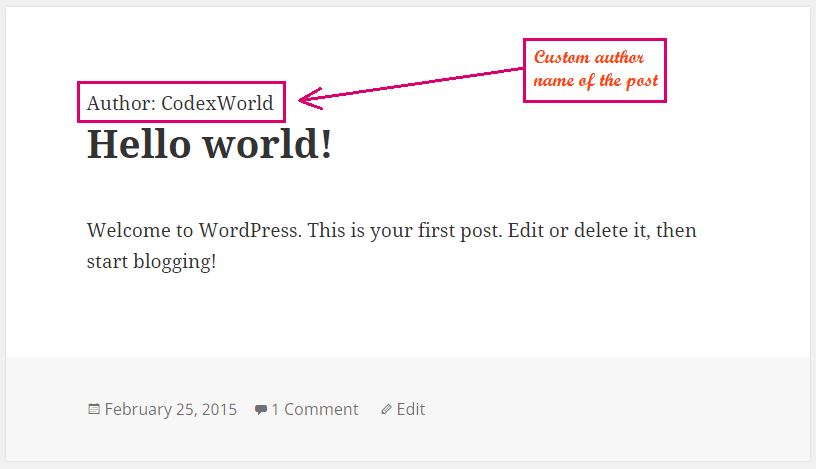
    echo 'Author: '.$post_author_name;
?>
You can see the custom meta field value into the post display. The custom author name of the respective post would be displayed.

Do you want to get implementation help, or enhance the functionality of this script? Click here to Submit Service Request
Hey codexworld Thank you so much, that was a smooth respond you explain it so well that it seem so easy.
One last question. I want my product field to support a Shotcode so when i put a shortcode it works [myshortcode]
I’m not so sure where would i need to past this snap code ??
echo do_shortcode( get_post_meta( get_the_id(), ‘custom_field_key’, true ) );
Thank you
Please check our Custom Shortcode tutorial from here – Create Custom Shortcode in WordPress
Hey thank you so much for you code after browsing and looking for a solution only your code it seem to work well.
My only question is if i had to add more field example a radio box on Step 2: Rendering Custom Meta Box, Would I need to add this on Step 3: Saving Custom Meta Data
Thanks Oshi.
You should do the following modification at the above steps for adding radio buttons field into the custom meta box.
Step 2:
Add the radio buttons field array into the
$custom_meta_fieldsvariable like below.// Custom meta fields array$prefix = 'custom_';
$custom_meta_fields = array(
array(
'label'=> 'Gender',
'desc' => 'Choose the author gender',
'id' => $prefix.'author_gender',
'type' => 'radio',
'options' => array(
'Male' => 'Male',
'Female' => 'Female'
)
)
);
Add the radio buttons field HTML into the
show_custom_meta_box()callback function. Into theswitchstatement add the followingcase.// radio button fieldcase 'radio':
foreach($field['options'] as $val=>$label):
echo '<input type="radio" name="'.$field['id'].'" id="'.$field['id'].'" value="'.$val.'" ',$meta ? ' checked="checked"' : '',' />
<label for="'.$field['id'].'">'.$label.'</label> ';
endforeach;
echo '<br /><span class="description">'.$field['desc'].'</span>';
break;
Now you can see the radio buttons field into the Custom Meta section at the post add/edit page.
Step 4:
You need to use the below code for display the radio buttons value.